How to Create a Minecraft Server in 2026

So you decided to create your own Minecraft server?
Then this is the perfect guide for you! 🌟
Whether you want to play Vanilla with friends, create a minigames network like Hypixel or run a full modpack, this tutorial will walk you through everything step by step from start to finish. In the end you should know how to locally host your own server completely for free!
🧭 Choose Your Path
The first decision you should make is choosing which kind of server you want to create. Click on the images and follow the guide from there.

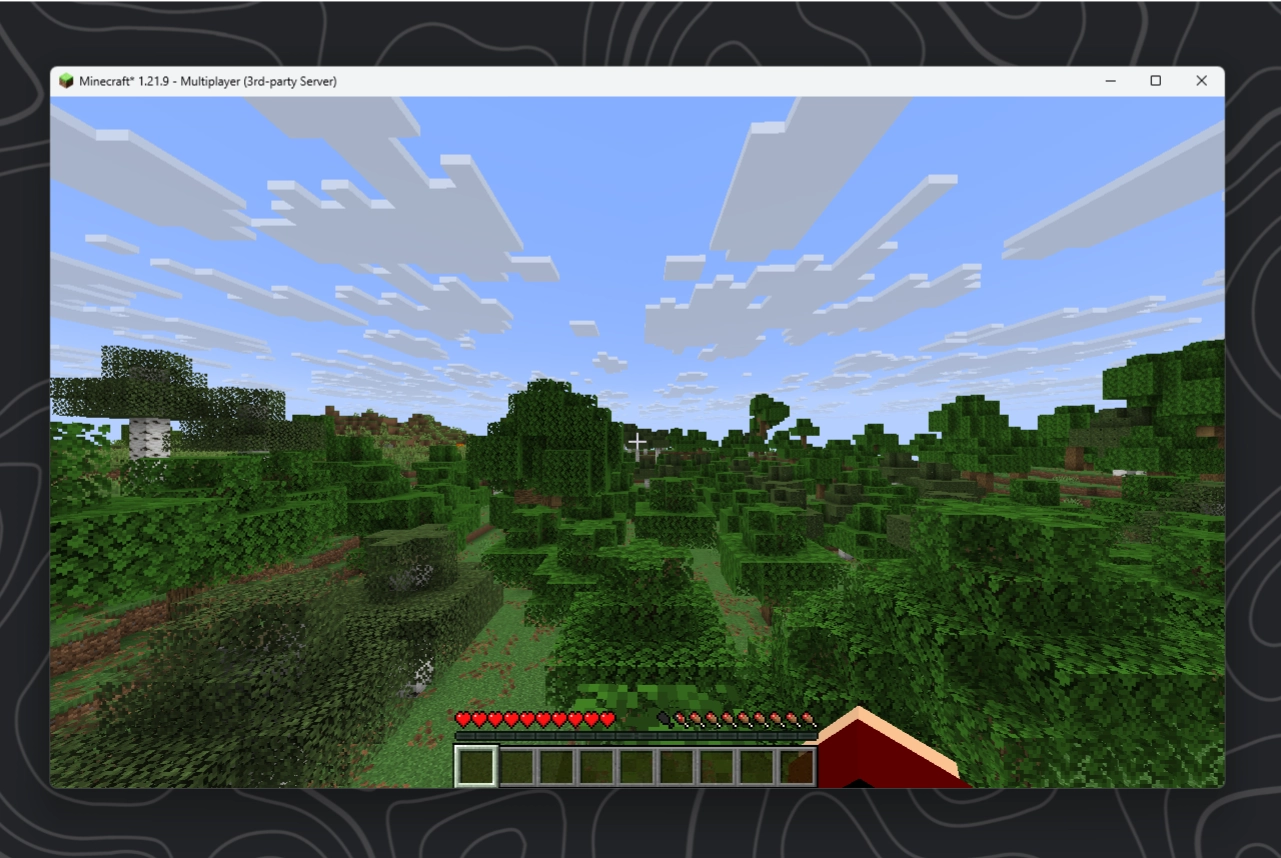
🌟 Vanilla Server
Simple server for playing with friends

🌍 Plugin Server
Add commands and custom features

🚀 Modded Server
Install mods and modpacks
📖 Getting Started
The sections below apply to all server types.
You can either start now by following the folder and Java guides below or instead start by following your server type specific instructions which tell you exactly when which step makes sense to complete.
Terminology
If you are new to game servers in general, I know that many people struggle with understanding all the new terms when they are just getting started. Therefore I created a terminology glossary which should be able to help you. You can you also try searching for the word you don't understand in the navigation bar at the top.
Server Folder Setup
Having good organization early on is pretty important when you start creating multiple servers for different purposes:
- Start by creating a folder called
Minecraft Serversor something similar, somewhere where you will remember its location. I would recommend either putting it at the root (most top level folder) of an external hard-drive, in your documents folder or somewhere in your user folder. - Inside that folder we will put all folders for our different Minecraft servers. Start by creating a new folder inside that one and calling it
First Serveror something similar. The important part is that you remember which server is inside that folder without having to boot it up. - If
Going forward let's assume you put the folder inside an external harddrive (e.g. D:/) You will want to name your individual servers as descriptive as possible:
Good 🌟
- D:1 folder
- Minecraft Server3 folders
- 1. Minecraft Server2 files
- ...
- ...
- 2. Minecraft Server2 files
- ...
- ...
- 3. Minecraft Server2 files
- ...
- ...
Better 🚀
- D:1 folder
- Minecraft Server3 folders
- Vanilla 1.21 SMP2 files
- ...
- ...
- RlCraft Modpack2 files
- ...
- ...
- Creative Server2 files
- ...
- ...
Choosing a Java Version
Minecraft uses different Java versions depending on the game version. Before starting your server, please make sure that you have the correct Java version installed.
| Minecraft Version | Java | Download |
|---|---|---|
| 1.16.5 and older | Java 8 | Adoptium |
| 1.17 | Java 16 | Adoptium* |
| 1.18 - 1.20.4 | Java 17 | Adoptium |
| 1.20.5 | Java 21 | Adoptium |
| 26.1 and newer | Java 25 | Adoptium |
When you have decided on which Minecraft version your server will run, click the download link next to the corresponding Java version. This will redirect you to download page for Eclipse Temurin.
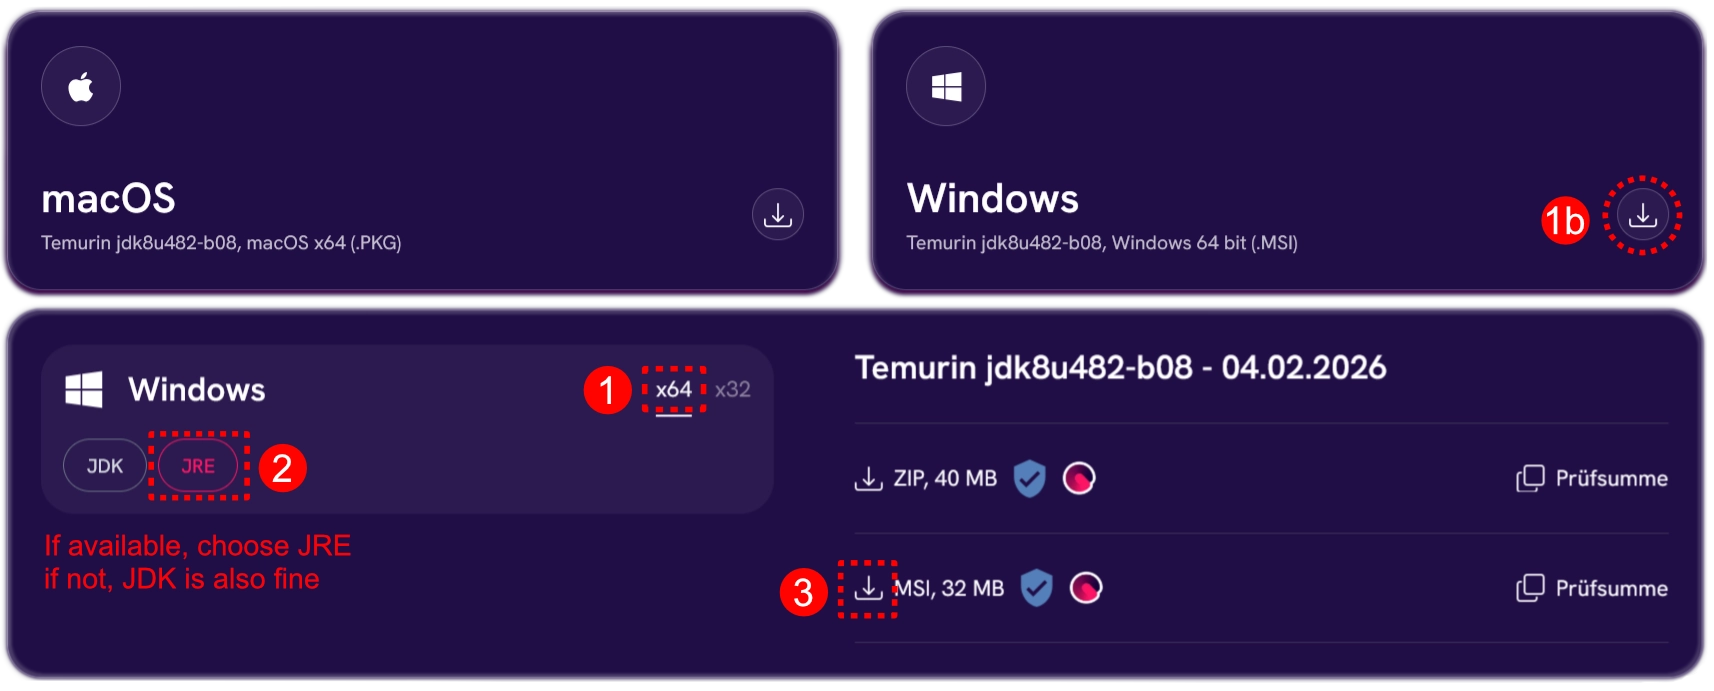
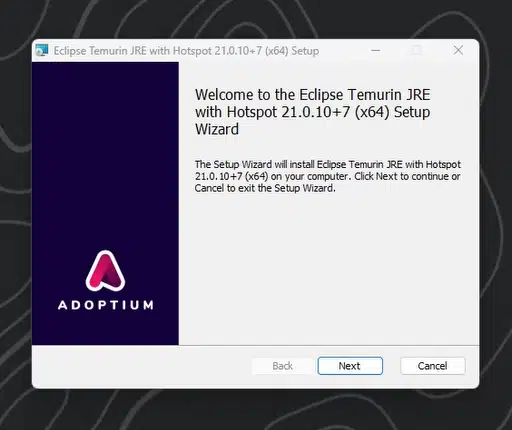
You can either click that big download button in the top right next to Windows or scroll down to the Windows Section. Here you will want to select x64 and then JRE if that option is available. Then click the MSI download button on the right.
When going through the installer make sure to select install on local harddrive when asked if you want to change the JAVA_HOME variable.
After the installation you can check if everything worked fine by opening a terminal and entering the command
java -version. This should report the version back to you, which you just installed.
INFO
Temurin is a free, open-source distribution of the Java Development Kit (JDK) built from OpenJDK and maintained by the Eclipse Adoptium project.
Creating a batch file
You should only follow the next steps once you have downloaded the server file for your server. If you haven't, you might want to choose a path first.
If we want to start a Minecraft server we need to create a batch file.
You can think of the batch file as a shortcut or preset that tells the server file how to run the server e.g. how much RAM it should be able to use etc. It is usually a very easy task but there are many little things that can go wrong that might throw you off.
Before starting with the steps below open your file explorer and open the folder you want your server to be created in, like e.g. Survival SMP, 1. MC Server etc.
Enable File Extensions
View > Show > File ExtensionCreate a new text file:
Right click in explorer > New > New text documentRenaming the file
Right click the file > rename >start.bat
Make sure that the file no longer has the.txtending and ends with.batConfirm renaming and file type
ClickYeswhen windows asks you if you want to change the file type.
After: View > Details
Check if under the Type row it says "Windows Batch File"Start editing the file
Right click the file >Edit in Notepad/Edit
Simple Batch file
This is the most basic form of a batch file.
It gets executed from top to bottom. If you want to understand more about batch files and what each line here does, check out my detailed guide for batch files.
The version below starts the server (server.jar) with 4GB of RAM.
You can change the values at -Xms and -Xmx to change that.
@echo off
java -Xms4G -Xmx4G -jar server.jar nogui
pauseWARNING
The server.jar part in the batch file above is directly referencing the server file (server.jar) which we will later download and move into the same folder.
These names need to ALWAYS match.
- Server Folder2 files
- start.batBatch file
- server.jarserver fileThe name of this file needs to match with the line in the batch file
Just to make this 100% clear, below you can find an example using the simple batch file template where I renamed the server to another name like for example paper-server.jar
📁 Server folder:
- Server Folder2 files
- start.bat
- paper-server.jar
💾 start.bat
@echo off
java -Xms4G -Xmx4G -jar paper-server.jar nogui
pause
Below you can find an optional advanced batch file with further optimizations. Click on Details to find out more.
Details
Optimized Batch File
There are custom flags you can add to a batch file which tell the server more specifically how to handle memory. The specific tweaks below are based on extensive research by Aikar, one of the developers behind PaperMC, who tried to find the most ideal flags to optimize server performance. Aikar's Flag Guide Github
The version below starts the server (server.jar) with 4GB of RAM.
You can change the values at -Xms and -Xmx to change that.
@echo off
title Minecraft Server
java -Xms4G -Xmx4G ^
-XX:+UseG1GC -XX:+ParallelRefProcEnabled -XX:MaxGCPauseMillis=200 ^
-XX:+UnlockExperimentalVMOptions -XX:+DisableExplicitGC ^
-XX:+AlwaysPreTouch -XX:G1NewSizePercent=30 -XX:G1MaxNewSizePercent=40 ^
-XX:G1HeapRegionSize=8M -XX:G1ReservePercent=20 -XX:G1HeapWastePercent=5 ^
-XX:G1MixedGCCountTarget=4 -XX:InitiatingHeapOccupancyPercent=15 ^
-XX:G1MixedGCLiveThresholdPercent=90 -XX:G1RSetUpdatingPauseTimePercent=5 ^
-XX:SurvivorRatio=32 -XX:+PerfDisableSharedMem -XX:MaxTenuringThreshold=1 ^
-Dusing.aikars.flags=https://mcflags.emc.gs -Daikars.new.flags=true ^
-jar server.jar nogui
pauseIMPORTANT
In line 12 above you can see -jar server.jar nogui. The server.jar part is directly referencing the server file name in the same folder as the batch file.
MEANING: The name of the server file and the server.jar part must ALWAYS match
🌟 Vanilla Server

This section is meant to explain how to create a basic Minecraft vanilla server. This means we will run an unmodified game server which does not support plugins or mods. This will give you the most pure Multiplayer experience, perfect for your first project, a creative server or speedrunning.
Before continuing make sure to create a new folder for your server as explained in the folder creation guide. You should also download and install the correct Java version for your Minecraft version.
Download Server file
In order to download the server file for a vanilla server you need to open your Minecraft Launcher. Make sure you have Java Edition selected and then click on the Installations tab. The next step is to click the New Installation button.

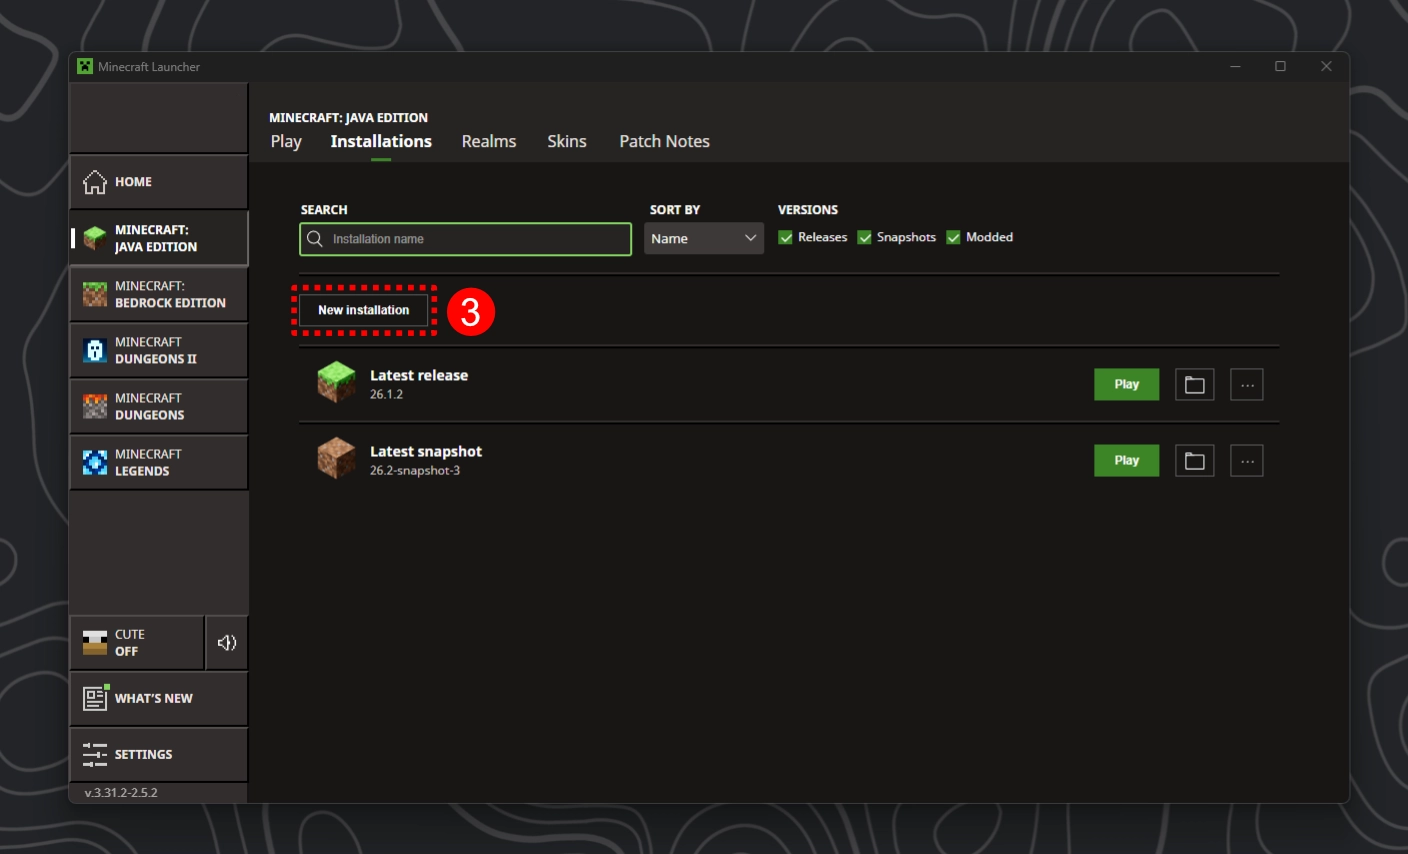
Once you click the New Installation button, select the Minecraft version you want your server running on.
After that click the little Server🔗 text. This will download the official vanilla server for that version from official Mojang servers.

INFO
If not done already, check which Java version you need for that Minecraft version with the table above. Make sure that when you open a terminal and enter the command java -version that it reports this back to you for confirmation.
Folder Setup
Move the server.jar file we just downloaded to your server's folder that you previously created with the folder creation guide.
It's now time to create a batch file for your server. We will need this file to start our server file with custom settings. Read the instructions carefully and come back when you created a start.bat file.
If you followed the folder creation, batch file creation and the upper server.jar instructions correctly, your folder should now look like this:
- Vanilla Server2 filesOr however you want to call your server
- start.bat
- server.jar
First Launch and EULA
Alright, now its getting interesting! Don't give up, you're nearly there! 🎉
- Double click the
start.batfile and watch your server boot up for the first time and immediately crash 😦 - But luckily this is completely normal and the server even gives you the reason why! If we take a look at the logs inside the terminal a few lines from the bottom you will find:
[16:57:58] [ServerMain/INFO]: You need to agree to the EULA in order to run the server. Go to eula.txt for more info.
If we take a look at our server folder now, you should notice that a few new files were created. It should look more or less similar to this:
- Vanilla Server3 folders, 4 files
- libraries
- logs
- versions
- eula.txt
- server.jar
- server.properties
- start.bat
As you might already suspect, in order to agree to Mojang's EULA you need to open the eula.txt file with a text editor.
At the bottom of the file you will find the text eula=false which you will have to change to eula=true and then save the file. Please be aware that by setting this value you agree to the offical Minecraft EULA. The EULA is a set of rules for server owners that for example ban pay to win by making it illegal to sell items on a server that give you a clear gameplay advantage over other players.
Starting & Joining
Alright, this is it! After opening the batch file again we can see that this time the server does not crash. If you take a look at the console or the server folder, you can see that there is now a world being generated in the folder!
Good job! Your server is now up and running. 🎉
[17:18:11] [Server thread/INFO]: Preparing level "world"
[17:18:11] [Server thread/INFO]: Selecting global world spawn...
[17:18:12] [Server thread/INFO]: Loading 0 persistent chunks...
[17:18:12] [Server thread/INFO]: Preparing spawn area: 100%
[17:18:12] [Server thread/INFO]: Time elapsed: 1200 ms
[17:18:12] [Server thread/INFO]: Done (1.321s)! For help, type "help"
Joining the server
- Launch a client with the same Minecraft version as your server.
- Go to Multiplayer and add a new server with the IP:
localhost - You should be able to instantly join. The console should show something like this:
[17:40:10] [User Authenticator #1/INFO]: UUID of player <username> is <UUID>
...
[17:40:13] [Server thread/INFO]: <Username> joined the game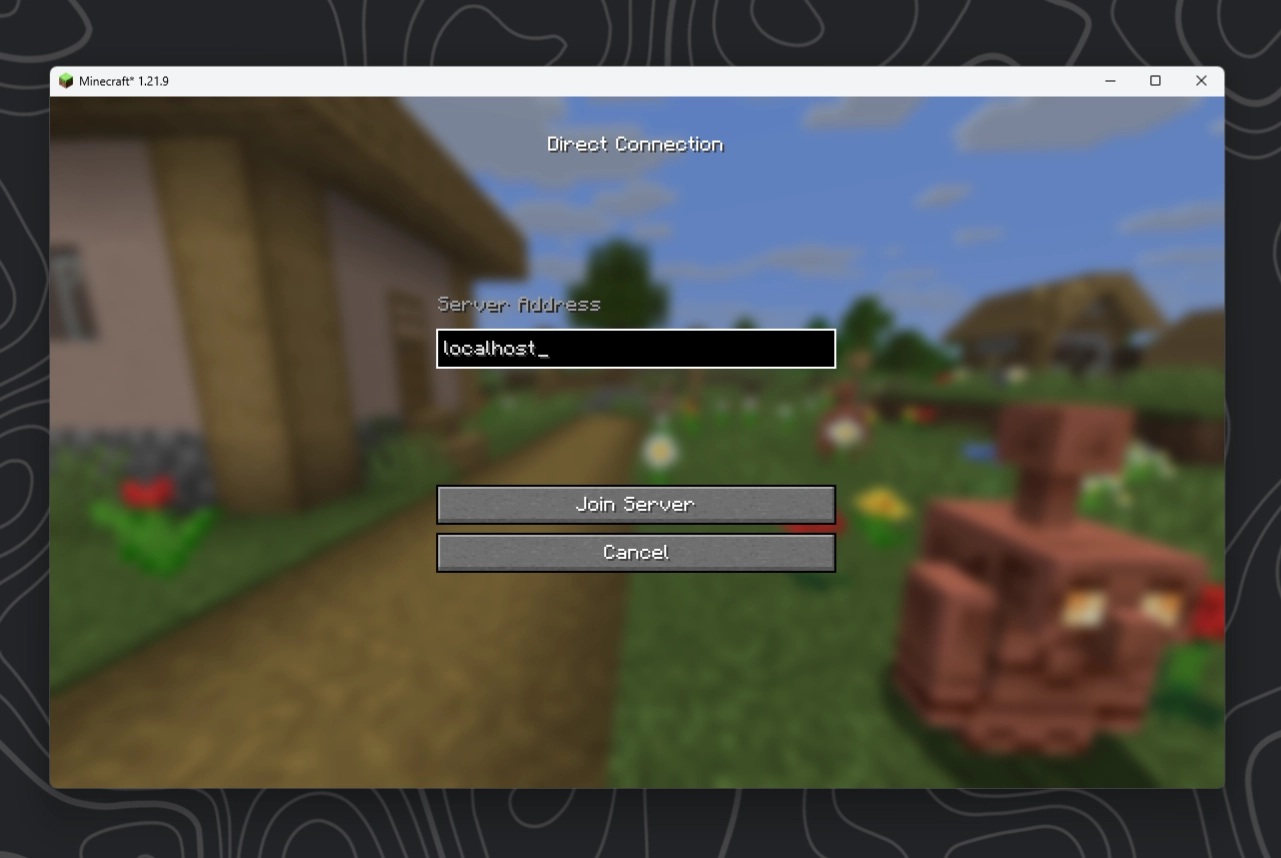
That's it! 🎉 Good job on following this tutorial so far! If you now want other people to join you will need to do some portforwarding, which I also have a comprehensive guide on.
If you have problems with other parts of the vanilla server instructions, take a look at the detailed vanilla guide.
You can stop the server by writing stop and pressing enter inside the terminal. You can find more useful commands here.
If you want to support me, please consider subscribing to my YouTube / Twitch and checking out my Patreon. Thank you so much!
Alternatively I am always happy about any donation via PayPal. ❤️
🌍 Plugin Server

You decided you want to create a server that supports plugins? Good choice.
Plugins allow you to add custom functionality to your server without having your players required to install anything. Plugins are what allows big server networks like Hypixel to offer minigames, leaderboards, lobby and party systems and so much more!
Whether you want to create your own minigame server, create an SMP with custom commands like /sethome, /tpa or /spawn or want to speedrun the game with custom challenges, plugins will be your way to go!
Before you continue, make sure to follow the folder creation guide above. Please also make sure that you have installed the correct Java version for your Minecraft version.
Which Version?
Contrary to Vanilla Servers, plugins can allow players from all different Minecraft version to join the same server. Servers like Hypixel for example let players from both 1.8 and 1.21 connect.
Choosing a version will be an important decision for your server because it will for example decide which blocks you will be able to use.
If you choose an older version (e.g. 1.8)
- ✅ Maximum compatibility: Every newer version can join without issues *
- ❌ Limited only to old blocks, mobs and mechanics from 1.8
- ❌ No 1.9 combat system
If you choose a newer version (e.g. 1.21)
- ✅ Access to modern features like blocks, mobs etc.
- ✅ Better server performance & support
- ✅ Can switch between old and new combat system
- ❌ Older client can connect, but the experience may be broken or limited *
*only possible with the ViaVersion plugin
INFO
For most servers, choosing a newer version is the correct choice.
Going for maximum compatibility by running on an old version is only usually done by Minigame Networks like Hypixel for maximizing player count.
Download the Server file

In order to download the PaperMC server .jar file, let's open their official website.
If you want your server run on the latest Minecraft version, then you can directly use the download button on their main page. If you want to use an older version you need to head to their build explorer where you can choose from all available versions.
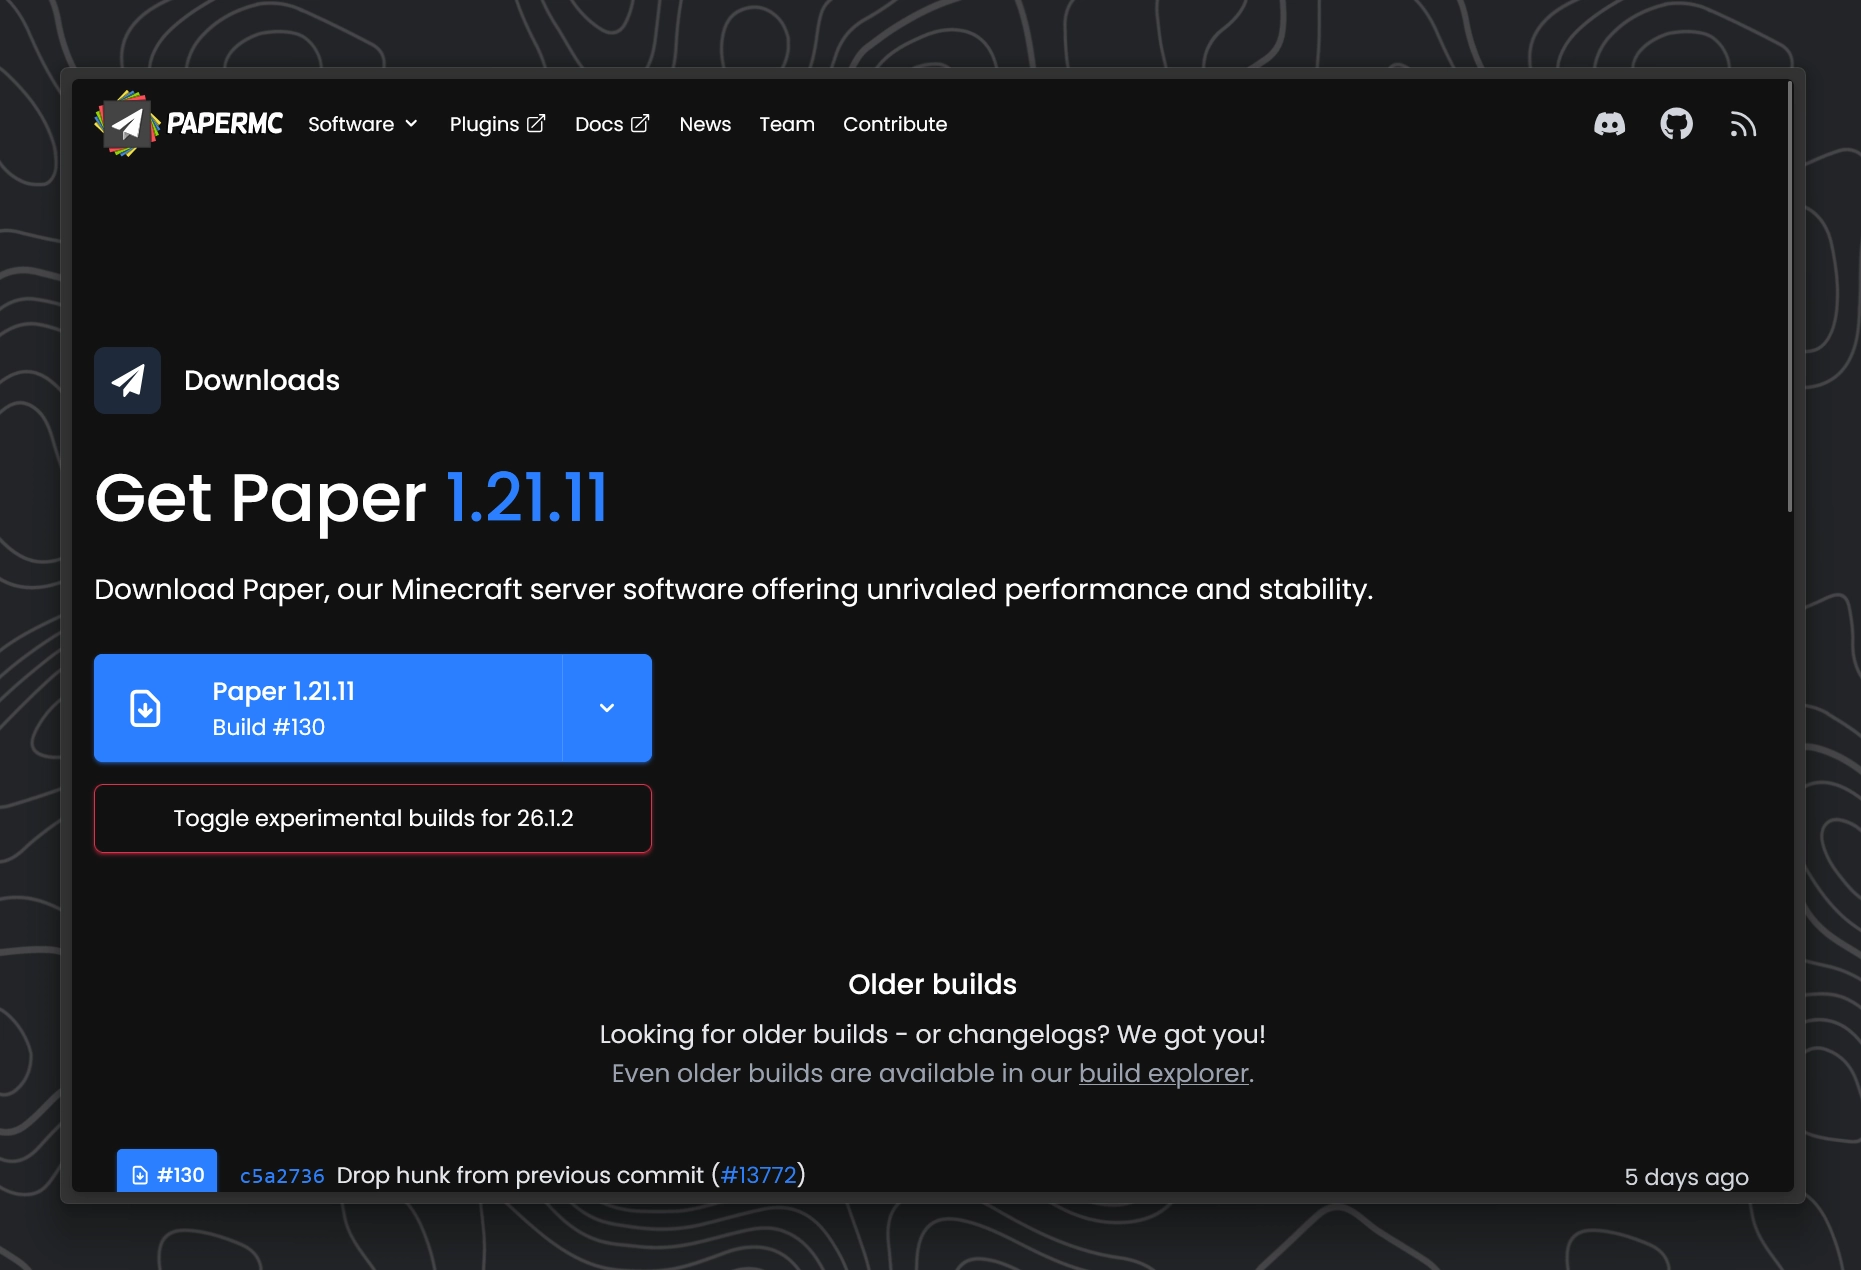
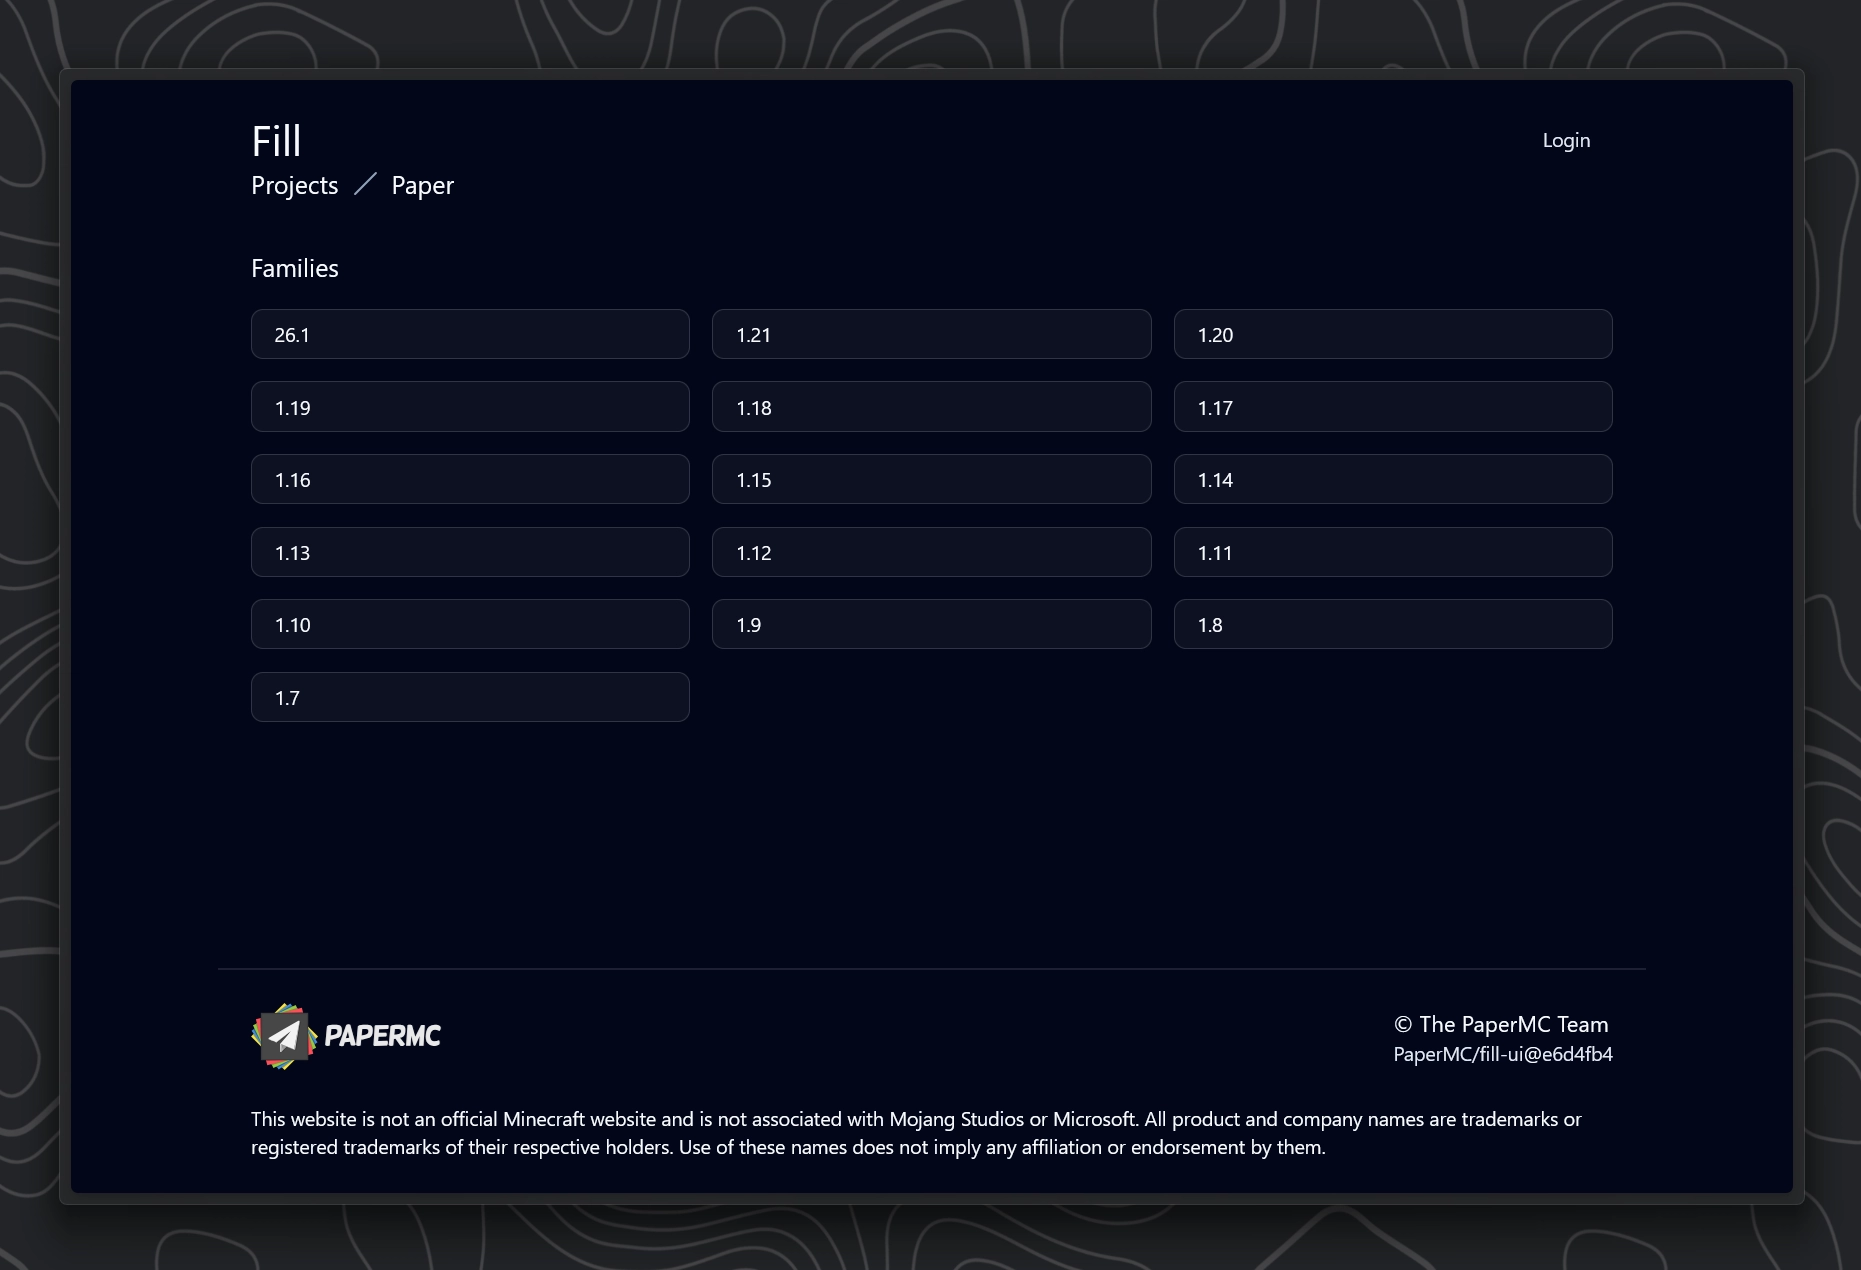
Click on the version you want (like 1.19 for example ) and then click on the subversion you want (e.g. 1.19.4). Don't worry if it says that the version is "unsupported" that just means that this version is not updated anymore and Paper can't guarantee there are not security issues with this version.
Move the downloaded server file to your server's folder which you previously created.
Now it's time to create a batch file for your server. Read the instructions carefully and come back when you created a start.bat file inside the server folder.
If you followed the folder creation, batch file creation and the upper server.jar instructions correctly, your folder should now look like this:
- Paper Server2 filesOr however you want to call your server
- start.bat
- server.jar
WARNING
Most server files from paper are named something like paper-1.21.11-130. Inside the batch guide I mentioned that the file names here need to match. You have 2 options:
- Rename the server file to
server.jar - Change the
server.jarpart of-jar server.jar noguiinside your batch file to the actual file name of the paper server.
⚠️Going forward this tutorial will assume that you renamed the file to server.jar but it should work the same way the other way around.
First Launch and EULA
Alright, now its getting interesting! don't give up, you're nearly there! 🎉
- Double click the
start.batfile and watch your server boot up for the first time and immediately crash 💀 - But luckily this is completely normal and the server even gives you the reason why! If we take a look at the logs inside the terminal a few lines from the bottom you will find:
[16:57:58] You need to agree to the EULA in order to run the server. Go to eula.txt for more info.
If we take a look at our server folder now, you should notice that a few new files were created. It should look more or less like this:
- Paper Server5 folders, 4 files
- cache
- libraries
- logs
- plugins
- versions
- eula.txt
- server.jar
- server.properties
- start.bat
You can agree to the Minecraft EULA by opening eula.txt and changing eula=false to eula=true at the bottom of the file. Don't forget to save the file 💾
Starting & Joining
Alright, this is it! After opening the batch file again we can see that this time the server does not crash. If you take a look at the console or the server folder, you can see that there is now a world being generated in the folder!
Good job! Your server is now up and running. 🎉
[20:45:46 INFO]: Preparing level "world"
[20:45:47 INFO]: Loading 0 persistent chunks for world 'minecraft:overworld'...
[20:45:47 INFO]: Preparing spawn area: 100%
[20:45:47 INFO]: Prepared spawn area in 1597 ms
[20:45:47 INFO]: Loading 0 persistent chunks for world 'minecraft:the_nether'...
[20:45:47 INFO]: Preparing spawn area: 100%
[20:45:47 INFO]: Prepared spawn area in 267 ms
[20:45:47 INFO]: Loading 0 persistent chunks for world 'minecraft:the_end'...
[20:45:47 INFO]: Preparing spawn area: 100%
[20:45:47 INFO]: Prepared spawn area in 68 ms
[20:45:47 INFO]: Done preparing level "world" (1.759s)
[20:45:47 INFO]: Done (6.792s)! For help, type "help"
Once you see this line in the console, players can join:
Done (1.321s)! For help, type "help"You should now be able to connect to the server by launching a Minecraft version matching your server and then connecting to the IP: localhost.
If you want to know how you can now install plugins or if you have any other problems, please take a look at the detailed guide for the Plugin server.
Specifically the Installing Plugins Section.
You're done! 🎉 Good job on following this tutorial so far! If you now want other people to join you will need to do some portforwarding, which I also have a comprehensive guide on.
You can stop the server by writing stop and pressing enter inside the terminal. You can find more useful commands here.
If you want to support me, please consider subscribing to my YouTube / Twitch and checking out my Patreon. Thank you so much!
Alternatively I am always happy about any donation via PayPal. ❤️
🚀 Modded Server

Alright, so I heard you want embark for new lands? Fly to the moon? Tame dragons, become the greatest wizard to ever exist and have a storage system so huge it could probably fit every atom in the universe? And do all that together with your friends? Well then you've certainly come to the right place! 🌟
Before you continue, let's create a folder for our modded server with these instructions. Also make sure to download the correct Java version for your Minecraft version
Choosing a Mod Loader
Assuming that you want create your own modpack, meaning you want to personally pick the mods you install, you will need to choose a mod loader. If you want to play an existing modpack instead, then please follow the modpack specific server guide. These usually already come with very detailed instructions.
In 2026 I would only really recommend one of these 3:


None of these are particularly better then the other. It really comes down to what mods you want to play and which version of Minecraft. Personally I would recommend that you take a look at the mods you are interested in and then note down which mod loader they are supported on.
If you don't have a set of mods just yet and want to keep going anyway, here's a recommendation table:
| Minecraft Version | Recommended Mod Loader (From left to right) |
|---|---|
| 1.1 - 1.16.5 | Forge |
| 1.17 - 1.20.1 | Fabric, Forge |
| 1.20.2 - 26.* and newer | Fabric, NeoForge, Forge |
INFO
The general rule of thumb:
If you are playing a newer version of Minecraft there will be more mods supporting Fabric and NeoForge. If you are playing older versions, mods will be more forge biased.
Download the server file
Depending on which mod loader you choose you will have to follow different instructions for downloading the server file. Below you will find 3 sections for the different modloaders. Jump to the one important for you with these links:
✨ Forge Server
Visit the official forge website and select a Minecraft version in the left sidebar. Then download the server installer by clicking on "Installer" in the "Download Recommended" section. If you need a specific forge version you can click on the "Show all Versions" button. Please keep in mind that this is talking about different forge versions for the same Minecraft version.
Wait for 5 seconds while ignoring the ads and then click the "Skip" button at the top right. Open the downloaded installer .jar file.
Once you open the installer make sure to select "Install server" After that select the path of your Minecraft server down below.
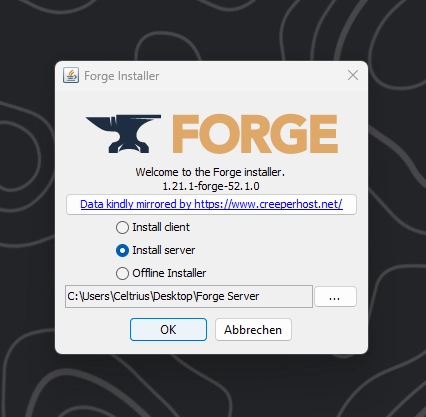
Please remember the forge version your server is running on because when you want to join with a client, that one needs to be running on the same forge version. That means either select the correct version in your preferred Minecraft Launcher or after installing the server, reopen the installer above and select "Install client" as well as your .minecraft path instead.
✨ Fabric Server
Downloading the fabric server file is pretty much as simple as vanilla. Go to the official fabric server page. Here you can select your Minecraft version and if you need even a specific fabric version. After clicking the blue button you are already done. You can move that downloaded .jar file into your Minecraft server folder.
✨ NeoForge Server
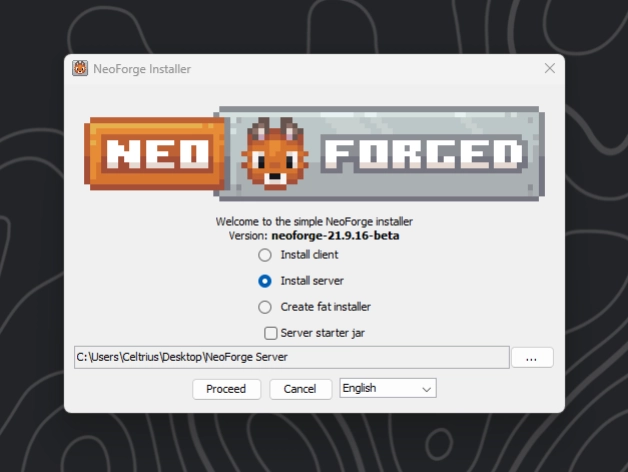
This one is pretty similar to the Forge server. First you need to head to the official NeoForge Website and download the installer by selecting your Minecraft version and then clicking the big orange button.
Select Install Server and select the path to your Minecraft server folder below.
Modded folder setup
Make sure that you followed the steps above correctly. If you choose the Fabric server or an older Forge / NeoForge Version where the installer does not provide you with a .bat file, please follow the instructions for creating your own batch file.
Your folder should now look like one of these 3
Forge (with provided .bat file)
- Forge Server1 folder, 5 files
- libraries
- forge-<version>.jar
- README.txt
- run.bat
- run.sh
- user_jvm_args.txt
- Fabric Server2 files
- server.jar
- start.bat
NeoForge (with provided .bat file)
- NeoForge Server1 folder, 3 files
- libraries
- run.sh
- run.bat
- user_jvm_args.txt
INFO
If you choose a Forge or NeoForge server and are installing a server for a newer version, they already provide a perfect setup with a batch file pre installed. That means you can skip creating a batch file and renaming of any files.
WARNING
As previously talked about, if we use our own batch file for example for fabric servers or older Forge / NeoForge servers that don't already provide a batch file, we need to make sure that the file names match. That means you either need to rename the server file into server.jar or edit your own batch file so that at the end of the file the server.jar in the -jar server.jar nogui matches the name of your actual server file in the folder.
First Launch and EULA
After double clicking the bat file your server will boot up and immediately crash 💀
But luckily that is completely normal since we first need to agree to the Minecraft EULA.
- Modded Server2 files
- ...
- eula.txt
Open the eula.txt file that was just created and edit the last line from eula=false to eula=true. After that save the file and reopen the .bat file again.
Starting & Joining
Alright, that's pretty much it! After reopening the server and waiting for the world to generate you should see the following line in the console at some point:
[17:18:54] [Server thread/INFO]: Done (0.260s)! For help, type "help"This means that at that point you should be able to join the server on the IP localhost If you want your friends to join, checkout the Portforwarding guide.
If you already know how, you can now start installing mods by dragging the files into the mods folder and then restarting the server. If you don't know how or have any other problems, please take a look at the detailed guide for the Modded server.
Over there you can find detailed instructions for installing mods.
That's it! 🎉 Good job on following this tutorial so far! If you now want other people to join you will need to do some portforwarding, which I also have a comprehensive guide on.
You can stop the server by writing stop and pressing enter inside the terminal. You can find more useful commands here.
If you want to support me, please consider reading the Afterword below ❤️
♥️ Afterword
If you read my guide to this point I want to personally thank you. I know for you this might've been just something you randomly found on the internet but for me this is a project that I've been working on for many weeks. I really appreciate you taking your time to read my guide.
Minecraft servers have been my passion for many years now. I remember when I first applied as a developer for a minecraft server in 2018 when I was just 14 years old 😂. Back then I could not even code but they took me anyway. Ever since then I have been working with servers.
Since 2019 I have been locally hosting servers on my computer whenever I want to play modpacks with my friends. I used to have a folder on an external HDD that contained over 150 different Minecraft servers, unfortunately that hard drive died last year which was pretty devastating 😅
If you have any other problems or questions feel free to write a comment on my YouTube, joining my Discord server or chatting with me while I am live on Twitch!
If you want to support me, please consider subscribing to my YouTube / Twitch and checking out my Patreon. Thank you so much!
Alternatively I am always happy about any donation via PayPal. ❤️